Spring初级
Spring初阶
概述
-
Spring是一款主流的Java EE 轻量级开源框架,目的是用于简化Java企业级引用的开发难度和开发周期
-
Spring框架是一个分层的面向切面的Java应用程序的一站式解决框架
-
两个核心模块:IOC和AOP
IOC:控制反转,将对象交给spring容器管理
AOP:面向切面编程,封装多个类公共行为
-
组件化:Spring 实现了使用简单的组件配置组合成一个复杂的应用。在 Spring 中可以使用XML和Java注解组合这些对象
-
非侵入式:基于Spring开发的应用中的对象可以不依赖于Spring的API
-
一站式:在 IOC 和 AOP 的基础上可以整合各种企业应用的开源框架和优秀的第三方类库
-
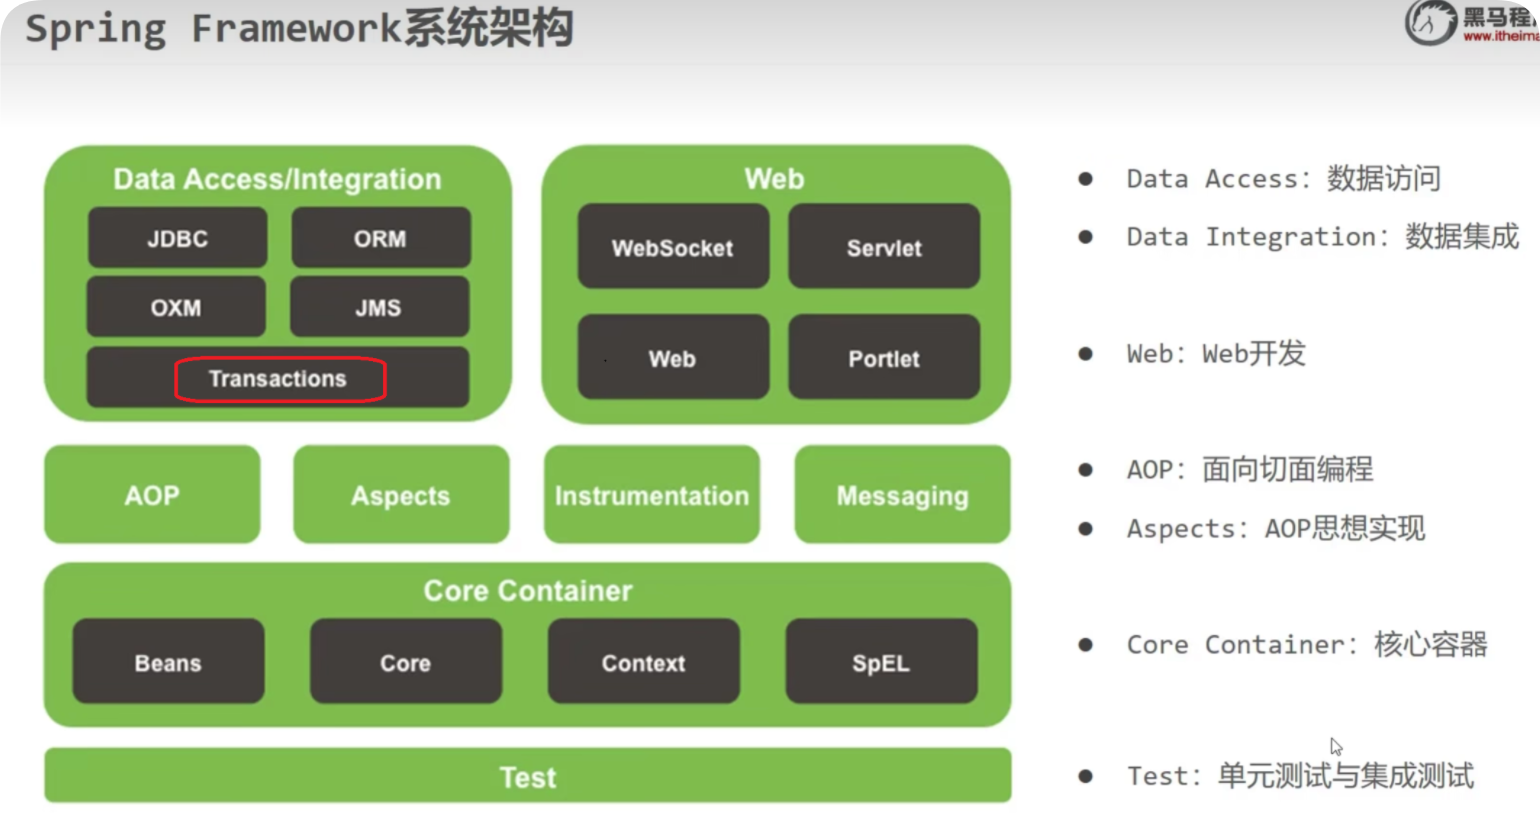
系统架构

IOC
-
什么是控制反转:由主动new产生对象转换为由外部提供对象,将对象创建权由程序转到外部
-
spring提供了一个IOC容器用来充当外部
- IOC容器负责对象的创建和初始化等一系列工作,被IOC容器管理的对象叫做Bean
-
DI:依赖注入 在容器中建立bean和bean之间的依赖关系的整个过程

具体实现
-
导入Spring依赖
1
2
3
4
5
6
7
8
9
10
11
12<dependencies>
<!-- spring context依赖
当引入此依赖后,表示将Spring的基础依赖引入了
-->
<dependency>
<groupId>org.springframework</groupId>
<artifactId>spring-context</artifactId>
<version>5.3.24</version>
</dependency>
</dependencies> -
在bean.xml文件中配置要创建的bean,id属性上下文不能重复
1
2
3
4
5
6
7
8
9
10
11
12
13
14
15
16
17
18
19
20
21
22
23
24
25
26
27
28
29
30
31
32
33
34
35
<beans xmlns="http://www.springframework.org/schema/beans"
xmlns:xsi="http://www.w3.org/2001/XMLSchema-instance"
xsi:schemaLocation="http://www.springframework.org/schema/beans http://www.springframework.org/schema/beans/spring-beans.xsd">
<!--完成user对象创建
id属性:唯一标识
class属性:要创建的对象所在类的绝对路径
-->
<bean id="user" class="cn.tedu.spring.User">
指定简单类型的值
注意,这里的name为speed和price,不是因为属性名就是speed和price,
而是set方法分别为setSpeed和setPrice,名称是通过将set删除,然后将第一个字母变小写得出;
<property name="name" value="旺财"/>
<property name="age" value="18"/>
</bean>
定义bean的作用范围,可选范围如下,scope属性
singleton:单例(默认)
prototype:非单例
</beans>
示范
<!-- 定义user这个bean 复杂数据类型注入 -->
<bean id="user" class="cn.tewuyiang.pojo.User">
<property name="name" value="aaa" />
<property name="age" value="123" />
<!-- car是引用类型,所以这里使用ref为其注入值,注入的就是上面定义的myCar
基本数据类型或Java包装类型使用value,
而引用类型使用ref,引用另外一个bean的id
-->
<property name="car" ref="myCar" />
</bean>
<!-- 扫描 com.ttpfx.entity.t2 包下的所有bean 通过注解注入-->
<context:component-scan base-package="com.ttpfx.entity.t2"/> -
初始化IOC容器
1
2
3
4
5
6
7
8
9
10
11
12
13
public class TestUser {
public static void main(String[] args) {
// 1.加载spring配置文件,进行对象创建,通过类路径创建
ApplicationContext context = new ClassPathXmlApplicationContext("bean.xml");
// 2.获取spring创建好的对象
User user = (User) context.getBean("user");
// 3.使用对象调用方法测试
System.out.println("user = " + user);
user.add();
}
} -
实例化bean的三种方式
-
构造注入
提供可访问的构造方法
无参方法不存在会抛出 BeanCreationException异常
name属性,指定构造器参数的名称,用index属性匹配构造器的参数下标指定
通过type属性匹配参数类型
1
2
3
4
5
6
7
8
9
10
11
12
13
14
15<bean id="myCar" class="cn.tewuyiang.pojo.Car">
<!-- 通过constructor-arg的name属性,指定构造器参数的名称,为参数赋值 -->
<constructor-arg name="speed" value="100" />
<constructor-arg name="price" value="99999.9"/>
</bean>
<bean id="user" class="cn.tewuyiang.pojo.User">
<constructor-arg name="name" value="aaa" />
<constructor-arg name="age" value="123" />
<!--
和之前一样,基本数据类型或Java包装类型使用value,
而引用类型使用ref,引用另外一个bean的id
-->
<constructor-arg name="car" ref="myCar" />
</bean> -
set注入
在bean中定义属性类型提供相应的set方法
name是set方法将set删除第一个字母小写得到的
1
2
3
4
5
6
7
8
9
10
11
12
13
14
15
16
17
18
19
20
21
<!-- 定义car这个bean,id为myCar -->
<bean id="myCar" class="cn.tewuyiang.pojo.Car">
<!--
为car的属性注入值,因为speed和price都是基本数据类型,所以使用value为属性设置值;
注意,这里的name为speed和price,不是因为属性名就是speed和price,
而是set方法分别为setSpeed和setPrice,名称是通过将set删除,然后将第一个字母变小写得出;
-->
<property name="speed" value="100"/>
<property name="price" value="99999.9"/>
</bean>
<!-- 定义user这个bean -->
<bean id="user" class="cn.tewuyiang.pojo.User">
<property name="name" value="aaa" />
<property name="age" value="123" />
<!-- car是引用类型,所以这里使用ref为其注入值,注入的就是上面定义的myCar
基本数据类型或Java包装类型使用value,
而引用类型使用ref,引用另外一个bean的id
-->
<property name="car" ref="myCar" />
</bean> -
静态工厂
静态工厂注入就是我们编写一个静态的工厂方法,这个工厂方法会返回一个我们需要的值,然后在配置文件中,我们指定使用这个工厂方法创建
bean1
2
3
4
5
6
7
8
9
10
11
12
13
14
15
16
17
18
19
20
21
22
23
24
25
26
27
28
29
30
31
32
33
34
35
36
37
38<!--
注意,这里的配置并不是创建一个SimpleFactory对象,取名为myCar,
这一句配置的意思是,调用SimpleFactory的getCar方法,创建一个car实例对象,
将这个car对象取名为myCar。
-->
<bean id="car" class="cn.tewuyiang.factory.SimpleFactory" factory-method="getCar"/>
<bean id="user" class="cn.tewuyiang.pojo.User">
<!-- name和age使用set注入 -->
<property name="name" value="aaa"/>
<property name="age" value="123"/>
<!-- 将上面配置的car,注入到user的car属性中 -->
<property name="car" ref="car"/>
</bean>
- 使用实例工厂注入
要实例对象才能调用工厂方法
```xml
<!-- 声明实例工厂bean,Spring容器需要先创建一个SimpleFactory对象,才能调用工厂方法 -->
<bean id="factory" class="cn.tewuyiang.factory.SimpleFactory" />
<!--
通过实例工厂的工厂方法,创建三个bean,通过factory-bean指定工厂对象,
通过factory-method指定需要调用的工厂方法
-->
<bean id="name" factory-bean="factory" factory-method="getName" />
<bean id="age" factory-bean="factory" factory-method="getAge" />
<bean id="car" factory-bean="factory" factory-method="getCar" />
<bean id="user" class="cn.tewuyiang.pojo.User">
<!-- 将上面通过实例工厂方法创建的bean,注入到user中 -->
<property name="name" ref="name"/>
<property name="age" ref="age"/>
<property name="car" ref="car"/>
</bean>
-
-
通过bean加载配置文件
1 | <!--1.开启context命名空间--> |
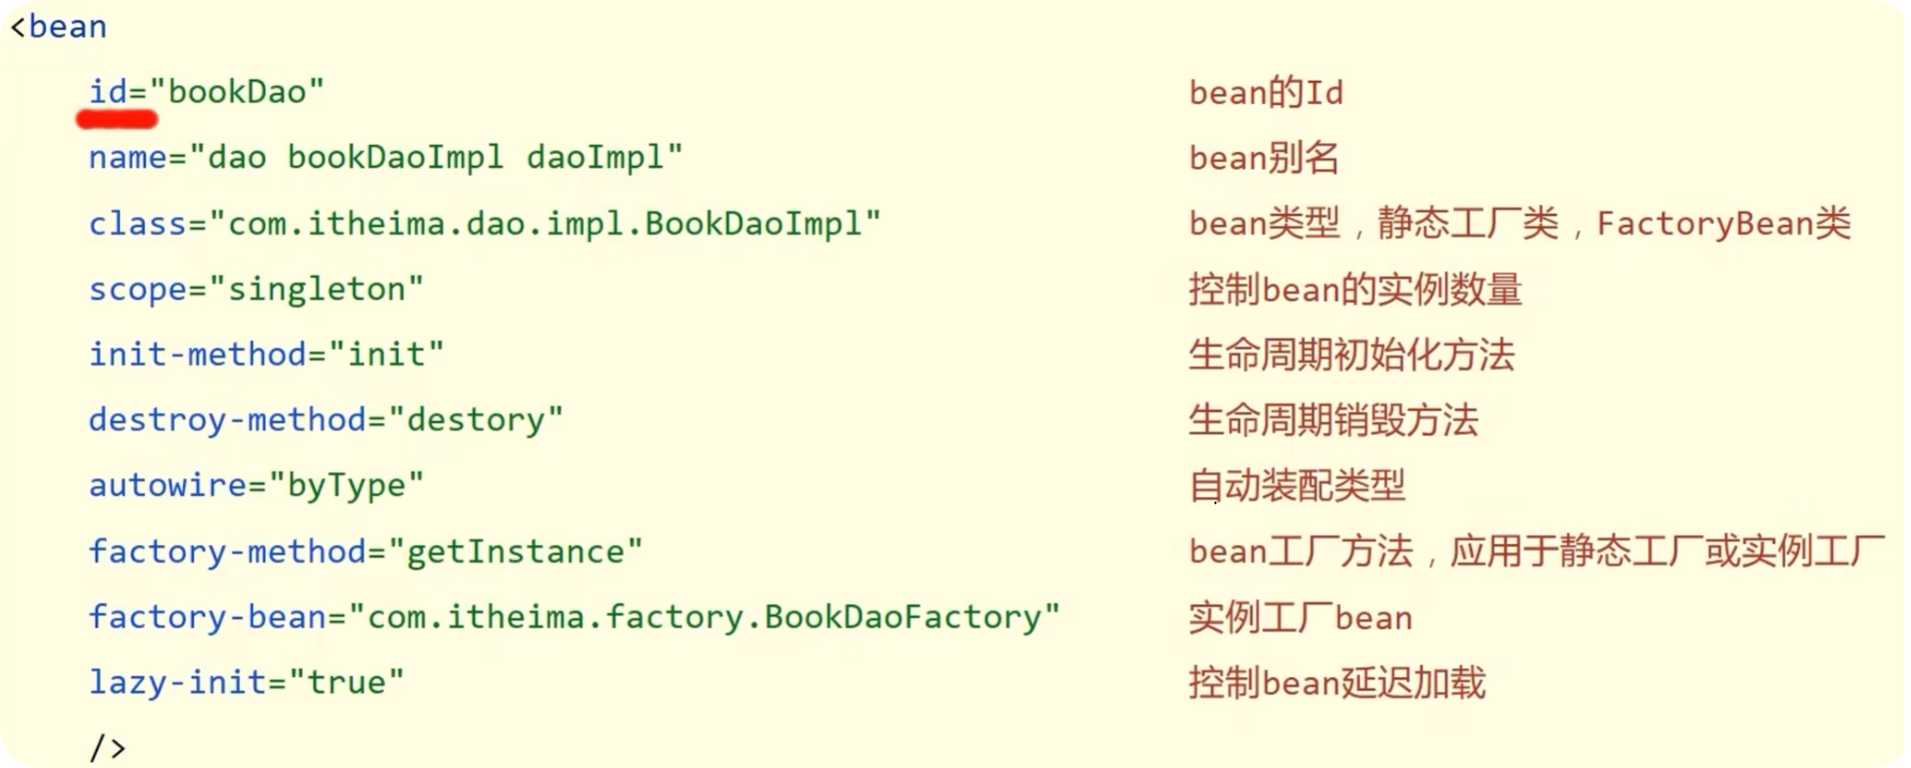
- 有关bean的属性

通过注解注入
注解 解释
@Configuration 标记的类是配置类
@ComponentScan(“包”) 指定哪个包只能添加一次,多个数据用{,,}形式,就扫描哪个包下的注解并识别。声明是spring管理的组件
@Autowired Bean的自动装配,可以标注在类的属性、方法及构造函数上。依赖注入
@Component 把普通类标记为Bean,加入到容器里,并且是单例模式。
@Bean 定义一个Bean对象,加入到Spring容器里,配置第三方bean
@Order(数字) 容器加载Bean的优先级,数字越小优先级越高
-
属性注入时,private私有属性,Spring是通过反射去加载它到Spring容器里的。
-
只有@ComponentScan扫描的包下的被@Component标记的类才能识别为Bean。
-
@Component是单例模式的。
-
定义bean的方式
1 |
|
- bean名称相同怎么办

-
自动装配基于反射设计对应属性为私有属性初始化数据,因此无需提供setter方法
-
自动装配建议使用无参构造方法创建对象(默认),如果不提供对应构造方法,请提供唯一的构造方法创建对象并暴力反射
-
@Value实现简单类型注入
-
@PropertySource(“classpath:jdbc.properties”),加载配置文件
-
使用@Import(JdbcConfig.class)注解手动加入配置类到核心配置,此注解只能添加一次,多个数据请用数组格式
AOP
-
具体是什么:面向切面编程,实现在不修改源代码的情况下给程序动态统一添加额外功能的一种技术,是对面向对象编程(OOP)的一种补充
-
使用的好处:
- 取代了传统纵向继承机制的重复性代码,其应用主要体现在事务处理、日志管理、权限控制、异常处理等方面
- 减少对业务代码的侵入,增强代码的可读性和可维护性
- 可以拦截指定的方法,并且对方法增强,无需侵入到业务代码中,使业务与非业务处理逻辑分离
核心概念
- 连接点:程序执行过程中的任意位置,粒度为执行方法、抛出异常、设置变量等,springAop为方法的执行
- 切入点:匹配连接点的式子(可以匹配一个方法也可以匹配多个方法)
- 通知(Advice):在切入点处执行的操作,共性功能,springAop中功能以方法呈现
- 切面(Aspect):描述通知与切入点的关系
工作流程
-
spring容器启动
-
读取所有切面配置中的切入点
-
初始化bean,判定bean对应的类中的方法是否匹配到任意切入点
失败:创建对象
成功:创建原始对象(目标对象)的代理对象
-
获取bean的执行方法
获取bean,调用方法并执行
获取的是bean的代理对象,根据代理的对象的运行模式运行原始方法和增强内容
使用
-
切入点表达式
1
2
3
4
5
6
7
8
9
10
11
12//切入点表达式标准格式:动作关键字(访问修饰符 返回值 包名.类/接口名.方法名(参数)异常名
execution (public User com,itheima.service.UserService.findById (int))
//可以使用通配符描述切入点,快速描述
//单个独立的任意符号,可以独立出现,也可以作为前缀或者后缀的匹配符出现
//*:匹配com.itheima包下的任意包中的UserService类或接口中所有find开头的带有一个参数的方法
execution(public *com.itheima.*.UserService.find*(*))
//...:多个连续的任意符号,可以独立出现,常用于简化包名与参数的书写
//匹配com包下的任意包中的UserService类或接口中所有名称为findByld的方
execution(public User com..UserService.findById(..))
//+:专用于匹配子类类型
execution(* *..*Service+.*(..))书写技巧
1
2
3
4
5
6
7
8
91.所有代码按照标准规范开发,否则以下技巧全部失效
2.描述切入点通常描述接口,而不描述实现类
3.访问控制修饰符针对接口开发均采用public描述(可省略访问控制修饰符描述
4.返回值类型对于增删改类使用精准类型加速匹配,对于查询类使用*通配快速描述
5.包名书写尽量不使用..匹配,效率过低,常用*做单个包描述匹配,或精准匹配
6.接口名/类名书写名称与模块相关的采用*匹配,例如UserService书写成*Service,绑定业务层接口名
7.方法名书写以动词进行精准匹配,名词采用*匹配,例如getByld书写成getBy*,selectAll书写成selectAl
8.参数规则较为复杂,根据业务方法灵活调整
9.通常不使用异常作为匹配规则 -
通知类型
- 前置通知:在目标方法执行之前执行的逻辑
- 后置通知:在目标方法执行之后执行的逻辑,不管目标方法是否抛出异常
- 环绕通知:在目标方法执行前后都可以执行的逻辑,它可以完全控制目标方法的执行
- 返回后通知:在目标方法正常返回时执行的逻辑
- 抛出异常后通知:在目标方法抛出异常时执行的逻辑
-
使用
-
导入坐标
1
2
3
4
5<dependency>
<groupId>org.springframework</groupId>
<artifactId>spring-aop</artifactId>
<version>6.1.8</version>
</dependency> -
定义切面和切点
1
2
3
4
5
6
7
8
9// 当前类是一个切面
public class UserAspect {
// 定义一个切点(设置拦截规则)
public void pointcut() {
}
} -
实现通知方法
1
2
3
4
5
6
7
8
9
10
11
12
13
14
15
16
17
18
19
20
21
22
23
24
25
26
27
28
29
30
31
32// 当前类是一个切面
public class UserAspect {
// 定义一个切点(设置拦截规则)
public void pointcut() {
}
// 定义 pointcut 切点的前置通知
public void doBefore() {
System.out.println("执行前置通知");
}
// 后置通知
public void doAfter() {
System.out.println("执行后置通知");
}
// 返回之后通知
public void doAfterReturning() {
System.out.println("执行返回之后通知");
}
// 抛出异常之后通知
public void doAfterThrowing() {
System.out.println("执行抛出异常之后通知");
}
}
-
Spring 事务
-
事务作用:在数据层保障一系列的数据库操作同成功同失败
Spring事务作用:在数据层或业务层保障一系列的数据库操作同成功同失败 -
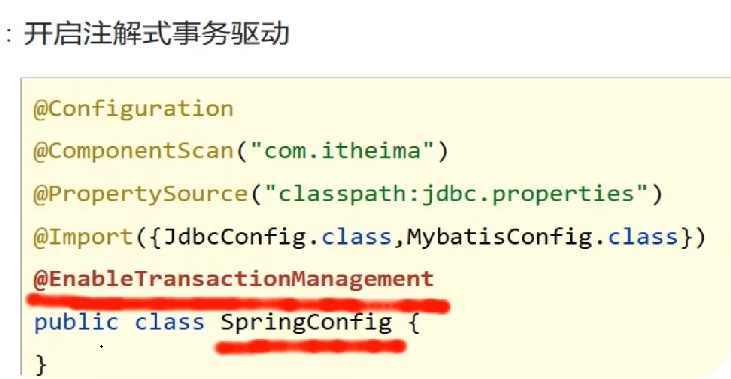
开启注解事务注解

-
在业务层接口上添加Spring事务管理,
1
2
3
4
5
6//Spring注解式事务通常添加在业务层接口中而不会添加到业务层实现类中,降低耦合
//注解式事务可以添加到业务方法上表示当前方法开启事务,也可以添加到接口上表示当前接口所有方法开启事务
public interface AccountService {
public void transfer(string out,string in ,Double money);
} -
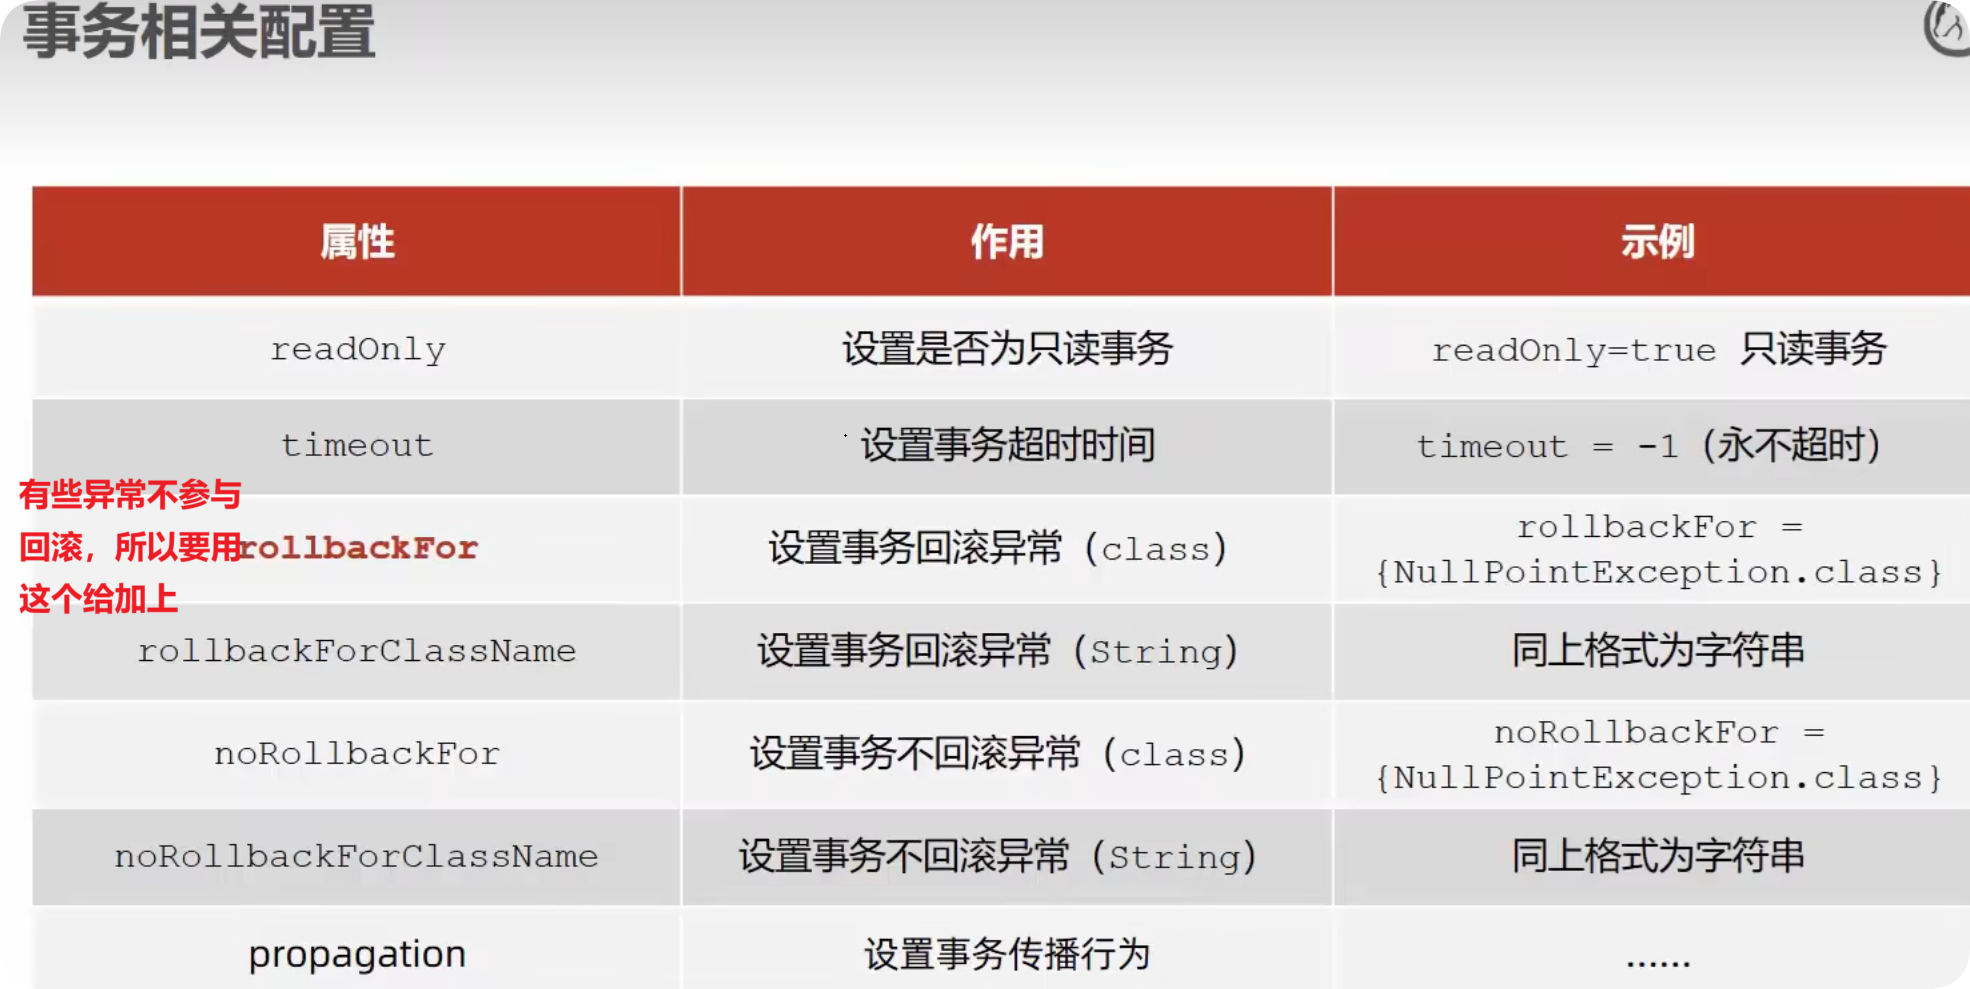
相关配置

-
事务的传播行为
在Spring事务配置
@Transactional注解有两个属性- rollbackFor 事务回滚异常,默认情况下只有出现
RuntimeException时才会回滚异常,如果在程序中抛出其他的异常,就会导致事务不会回滚,一定要注意这个点,指定Exception.class就会包含所有的异常 - propagation 设置事务的传播行为 ,事务具有传播性,如果在一个开启了事务的类中使用的一个方法也开启了事务的话,当前的事务会传播到下一个事务,该属性的默认值为
REQUIRED,也就是会将后面的事务加入到前面的事务当中,如果在方法中出现了异常也会将后面的事务回滚,但在我们记录日志的过程中无论成功还是失败都需要记录一下日志信息,也就是要开启一个新事务,而不是将后面需要事务的代码加入到当前的事务中,所以要设置这个属性的值为REQUIRES_NEW
- rollbackFor 事务回滚异常,默认情况下只有出现


